


Ubuntu Firefox Themes
Introduction
Background
In April 2006 I checked out a beta version of the Dapper Drake release of Ubuntu Linux. I was really impressed by the polish of the desktop and the apparent thought that went into making the distribution. Besides being really amazed about the quality I also found some points for improvement.
I set out to file several bugs, most of them being against the default Firefox theme included with Ubuntu, which didn't really match any of the desktop's colors or icons. Patiently I awaited responses, but as a long-time Ubuntu user I decided to take matters in my own hand and do something about it myself.
I didn't have any experience theming Firefox but was eager to learn. Read on for the result, or go directly to the download and installation page.
The Early Steps
First fake impressions
The first step was to learn something about how Firefox themes are built so I could create one myself. I found out that themes come bundled as JAR files which are actually renamed ZIP files. Unpacking some downloaded themes revealed the structure and building blocks of a theme.
There's a lot of CSS in there and a lot of images. Replacing images so that the icons would match with the desktop theme would be the only way to go, but there was one small problem. Most of the icons in a theme are bundled in a single image file, like this one for example (taken from the default Firefox theme):
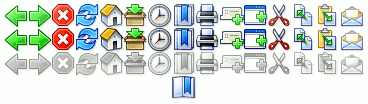
Toolbar icons are aligned grid-like in a single image file.
At first, I fooled around by replacing the top row of icons with their replacements, creating some screenshots and asking people for their opinions. This was a good idea to get some initial impressions, but manually replacing each and every icon would be far too tedious and error-prone. And what was I supposed to do when an icon changed?
On top of that, it costs a lot of time to create highlighted and disabled versions of the icons. I knew the solution but it would take some time.
Getting automated
Icon theme fallback support
When I had decided to really go for it, I fired up my PHP editing environment and started writing some shellscripts. You might be biased against PHP, but for the task at hand it was the right tool for the job for, I know it would've taken longer in Bash or Perl.
First of all, I wrote some code that searches through GNOME icon folders and falls back to other themes so that I could properly inherit all icons from underlying themes. For example, the Human theme uses the following preference path:
- Prerendered Human
- Scalable Human
- Prerendered Tangerine
- Scalable Tangerine
- Prerendered Tango
- Scalable Tango
Yes, there are icons for which a scalable Tango icon is used in the Human theme. Luckily this is the same icon path taken in GNOME so all icons still match up with the desktop.
With the fallback problem out of the way, I set out to automate the automated image composition.
A lot of things, if I could I'd rearrange
Enter Imagemagick, probably even more Swiss than a Swiss army knife, it's your command line assistant for image manipulation. It can be difficult to learn, but when you know it inside out you'll never have any problems automating image tricks anymore.
By using the montage command I created rows of icons, like this:
montage -tile 20x1 -geometry 24x24 -background none [images] output.png
The "tile" parameter supplies the amount of images in the row, "geometry" defines each image's size and "background none" sets the background to full alpha transparency. Supply the icons next, followed by the output filename and you easily create something like this (I've added a white background and border for demonstration purposes):

A single row of Human icons arranged using Imagemagick.
Being able to do this really speeds up the process. Next up were creating the highlighted and disabled version of the icons.
More magic manipulation
The highlight effect I used for the theme closely resembles the default GTK2 behaviour: making the icon slightly lighter. I opted for a 10% increase in brightness, utilizing Imagemagick:
convert -modulate 110 input.png output.png
The highlight effect was easy to achieve, but what about the disabled effect? I figured out what the Firefox default theme had done: making the icon grayscale and then making it semi-transparent. Using Imagemagick I followed exactly those steps to achieve an effect that is indistinguishable from the default theme:
convert -fx G input.png grayscale.png

convert -channel alpha -fx u-0.5 grayscale.png output.png
These two chained commands give a good looking disabled effect.
With all the states of the icons ready, there was only one last small obstacle: combining those states into a single image. This step looks similar to the row creation:
montage -tile 1x4 -geometry 360x24 -background none [images] output.png
After all programming these steps I could now automatically created images like these (again, white background added for clarity):

Multiple rows of automatically generated icons with state indication.
Creating the rest of the icon images was a breeze once the boilerplate was in place. I decided to raise the bar even more, by automatically generating the theme preview images as well.
Advanced Imagemagick tricks for the preview
Let me first show you what the end result looks like (like a real preview):
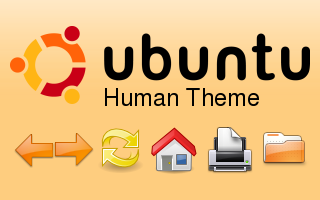
The automatically generated preview image for the Human theme.
That looks great doesn't it? The first step was getting the background, this consists of three steps: first creating an empty white canvas, then overlaying a stretched selection background image from Firefox. In Imagemagick that procedure looks like this:
// create empty white rectangle

convert -size 320x200 xc:white white.png


// stretch selection image, watch the exclamation mark

convert -resize 320x200\! input.png resized.png


// overlay the stretched image on the white one

composite -compose atop resized.png white.png output.png
With the basic background in place, we can now add the Ubuntu logo by overlaying it, we also apply an offset using "geometry":
composite -compose atop -geometry +10+26 logo.png background.png output.png
Drawing the theme name is done like this:
convert -pointsize 24 -draw "text 100,100 'Human Theme'" input.png output.png
Adding the icons in the bottom row is done similar to adding the logo, so I won't repeat it here.
Finishing Touches
Packaging
With all the images in place, some patched CSS files ready and a nice preview I was ready to ship the first version of the theme to testers. I created some new RDF description files for each theme and packaged everything using the jar tool.
Installation can be done using drag and drop on the Firefox Theme dialog or by creating some specially crafted weblinks. Speaking of which, download and install the theme here.
The source code for the theme generation scripts can be found in the CVS repository.
About this project
This project page was added on the 6th of May 2006.
Related pages
Check out these pages for more information on Ubuntu Linux and Firefox themes: