


Blender Tips and Tricks
Introduction
Background
This article contains several tips for Blender, the open-source 3D modeling, animation and compositing application. If you're already fully up to speed with Blender you still might find these tips to be helpful so skim over this article to see if there's something of interest to you.
I wrote these tips because I had to find out the hard way and if I had known these things beforehand, my modeling and animation projects would've been a lot less frustrating.
Changing Global FPS
What you want
I've been in this situation quite a few times: the scene is fully set-up, lights are in place, rigging and animation is done and the whole flow of your work is finished to the last detail. Except the animation render settings are less-than-optimal.
Of course, you've set up the frame size to PAL, NTSC or another format and you may have set your frame rate to something like 12 frames per second because you don't want to render at the full frame rate while drafting, but at the end you find out that you'd really wanted to render at 25 or 29.97 frames per second.
It happened to me when rendering a cut-out style cartoon-like animation for a PAL production: shooting on twos is good enough for animation so I started with 12 frames per second, but PAL is usually displayed at 25 FPS, which is not a multiple of 12, of vice versa.
Whereas NTSC nicely pulls up from 15 to 30 frames per second I was left with an animation with a very short pause each second because one frame out of twelve would be displayed for 3/25 of the time instead of 2/25. Rendering the animation again at either 5 or 25 frames per second would solve the issue.
But how do you do this without the Blender animation running either too slow or too fast? We'd either need to drop frames at non-regular intervals from the 12 FPS footage, or render again at a different number of frames per second, without affecting the overall speed of animation.
Solution: remapping frames in Blender
There are several solutions to the problem, but the best one in this case was to have Blender remap the frame timing and then re-rendering the whole sequence at 25 FPS. Remapping frames this way preserves the original timing while either adding or dropping frames in the resulting animation.
To remap frame timings in Blender, use the Map Old and Map New settings in the Animation tab of the Scene settings pane in the buttons window. To get there, first click the 'landscape' button at the top of the buttons window and then click the 'wavy arrow' button next to it, as depicted in this screenshot:
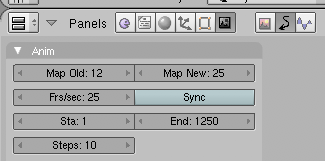
Blender animation frame rate remapping settings in the Animation tab of the Scene settings window.
The top row of the tab contains the Map Old and Map New settings which control the conversion ratio of the number of frames per second.
If your scene is set up to X FPS (X is 12 for my case) and you'd want to render at Y FPS (Y is 25 for my example), you'll want to fill in the value of X in the Map Old setting and set Map New to Y. You can see that my screenshot is set up this way, from 12 FPS to 25 FPS.
Next, use the Frs/sec setting to set the actual number of playback frames per second, which in my case is 25 (the value of Y as explained above).
Lastly, divide the starting frame 'Sta' and ending frame 'End' numbers by X (old FPS) and then multiply them by Y (new FPS) to make sure you will be rendering the exact same duration, just with more or less frames than before. If your animation starts on frame number 1, you can simply leave it at that.
In my example screenshot, my animation initially lasted for 600 frames, but because of the increase in frame rate, it now lasts (600 / 12 x 25 =) 1250 frames.
So, there you have it -- the easiest way to change the number of frames per second of your animation in Blender.
Other solutions
It's entirely possible to simply set the new number of frames per second in the animation settings window as you would do normally and to then scale the keyframe timing of all individual objects, materials and the world, but it's a lot more hassle than simply remapping frame timings.
To scale keyframe timing, select an object in the 3D view and open an IPO curve editor window. Press the K key to switch from curve editing to keyframe editing, select all keyframes using the A key and type the S key to scale the keyframes using the mouse.
You'll probably soon find out that this way of scaling keyframes is less optimal than remapping frame timings, but it's a handy tool if you simply want to shorten or lengthen an individual object's animation timing.
Output Filesize Limits
Introduction
While Blender does a remarkable job at rendering long animations on multi-core CPUs without any problems, you might find out afterwards that the hard rendering work is unusable because you hit an arbitrary file size limit in the output format. If you think this sounds farfetched, let's just take a look at some numbers.
AVI Raw, blessing and curse
I usually render either short animations at PAL DV frame sizes or longer ones for web presentations at low resolutions under 100K pixels per frame. When rendering in Blender, I don't want compression artifacts in the output and I also don't like 2K+ individual frames stored as image data, so I use the AVI Raw animation output format.
It works great in all the editing software I use and it's nice to have crisp and vivid source material to edit, but there's a catch. You run into trouble when the file size exceeds 2 gigabytes, which might sound like a lot, however you run into that limit far earlier than you'd expect.
If you're rendering PAL DV video at 720 by 576 pixels, each frame takes up about 1.2 megabytes of disk space. That means you can store about 1725 frames at that resolution in a two gigabyte file. At the normal PAL DV frame rate of 25 frames per second, that's about one minute and nine seconds of video. One second more and your output file is useless.
Solution: Quicktime PNG
The solution, at least on Mac OS X and possible Windows, is to use the Quicktime output format with the PNG codec. PNG is a great compression algorithm for rendered images, it's lossless and pretty fast for encoding and decoding.
Using Quicktime PNG solves the problem from two sides: each frame takes up less space because of its compression and it alleviates the file size limit of 2 gigabytes. On top of that, it's much easier and faster to use for editing since the data rate is a lot lower, again due to compression.
I know this isn't of much help to all Linux users out there, so if you know of a way to work around the AVI Raw file size limit, let me know and I'll put it up here.
About this article
This article was added to the site on December 20th, 2007 and initially contained the frame remapping and AVI Raw file size limit tips.
Related articles
These following media-related articles might also interest you: